- Due:
-
Saturday, January 17, 10pm
- Starter code:
- See Assignment 1 on Canvas for the Github Classroom link.
- Submission:
-
Submit the contents of your repository via Gradescope. See Deliverables below for what to submit.
This is an individual assignment.
The purpose of our first assignment is to make sure everybody is able to set up a working environment and to familiarize yourself with the terminal, shell, and the C compiler, as well as the process of submitting deliverables. It might be worthwhile to take a look at the Deliverables at the end of this assignment and then work through the tasks. We will also reserve some time in class to help walk you through the process and fix issues that might arise.
For this class, we need everybody to have a working Linux environment to work in. There are multiple ways to achieve this goal, but we want to make sure you are at least able to use Github Codespaces.
A Note on Windows
If you are working on a Windows machine, we strongly recommend setting up Windows Subsystem for Linux 2 (WSL2). This will give you access to a Linux environment directly on your computer. Read more about WSL2. The rest of the description here assumes you have a working Unix-like terminal.
Part 1 - Sign up for GitHub Student Developer Pack
Everybody in this class should have an Intel x86-64 Linux environment to develop and test their code. You might already have a Linux installation on your machine or VM. However, to make sure we all have access to a reasonably similar environment, we will use Github Codespaces. Codespaces is free for any Github user to use, but, alas, the free version has a limited number of CPU hours per month (60 for a 2-core VM) available. Applying for the Student Developer Pack allows you to extend the computation time available to you to 90 hours per month for a 2-core VM. It also comes with additional perks.
If you do not already have one, create a Github.com account.
Sign up for the Student Developer Pack. Note, unless your Husky card contains an expiration date, you might need to upload a transcript or another document that contains and end date for your studies.
Part 2 - Accept the Github Classroom invitation and start Codespaces
Unless you have done so already, head to the Canvas page for this assignment and accept the Github Classroom invitation. This will create your own copy of the starter repository for this assignment.
Open Codespaces from within the repository.
You will be provided with a web-based VS Code interface to edit your files. Stop! For this assignment at least, resist the urge to use the pretty VS Code editor. Instead, focus on the terminal below the editor window and find the “Maximize Panel Size” button to have the terminal take over the whole view. Complete the rest of this assignment inside this terminal. Alternatively, you should be able to use the Terminal on macOS or the Ubuntu terminal provided by WSL on Windows.
Part 3 - The (at least) 10 Commands
Try running the following commands. Skim through each command’s manpage. For Assignment 1, we will ask you to copy and paste the console history of running some of these commands.
- ls - lists the files and folders in the current directory.
- pwd - Echos (i.e. prints) the current directory you are in to the terminal
- mkdir - Create a new directory
- rmdir - Removes an empty directory
- cd - Change directory
- mv - Allows you to move a file elsewhere (sometimes I use this to rename a file)
- cp - Copies a file
- touch - Typically I use to create a new empty file that does not exist.
- man - Manual pages
- ps - Shows which processes are running
- echo - Prints out a line of text.
- whoami - Prints which user you are logged in as.
- sort - Sorts information
- cat - Concatenates files and prints them to standard output
- nl - Outputs a file with number of lines
- cut - Remove sections from each file
- grep - Prints lines that match a pattern. This is a very powerful serach command.
- Other interesting commands/programs include: cut, sed, awk, locate, clear
Note from instructor: We included urls to the manpages above, but it will almost always be faster for you to search the man pages within your terminal (and if you do not have terminal access, you will want to use the web version anyway).
Task
Meaningfully experiment with and run at least 10 of the above
commands. See the first deliverable for what
to submit. “Meaningfully” means that you do not just type the command
names one after the other, but provide a sensible use case. For example,
show a man page using man. Or use sort to sort
the lines of an actual file. Use cp to copy an actual file.
The idea is that you explore and get a basic familiarity with at least
10 commands from the above list.
Navigating the terminal quickly (Read and try each)
Here are some other nice things to know with the terminal.
- Pressing the up-arrow and down-arrow keys iterates through your command history (There is also a commmand called history you can checkout).
- Pressing tab autocompletes if it finds a program, command,
or file path.
- Start typing
mkdithen hittab tabcan also auto-complete filenames and filepaths, this can be especially helpful!
- Start typing
- Pressing Ctrl+C sends a signal to the terminal to terminate a
program if it gets stuck.
- Type:
grep .and press Enter to run it. Then pressCtrl+Cto terminate.
- Type:
- Pressing Ctrl+Z sends a signal to the terminal to suspend a program
and give you back control.
- You can play with this command by typing in sleep 10 (which puts the terminal to sleep) for 10 seconds, and see how you can terminate this program.
- Bring back the suspended program by using the command
fg.
- Practice getting help by typing
man grepinto the terminal. (Press q to quit the manual pages).
A bit of precision
Calling each of these ‘commands’ (i.e. ls, sort,
cat, etc.) is not really correct. Each of these is itself a
program (typically implemented in C or some other language).
As an example, here is the source code for ‘ls’: http://git.savannah.gnu.org/cgit/coreutils.git/tree/src/ls.c Each of these commands are part of the coreutils package in Unix. If you look through the source tree, you will additionally find many other programs (i.e. terminal commands you run in your shell) here: http://git.savannah.gnu.org/cgit/coreutils.git/tree/src/.
Part 4 - Get to know with an editor and the C compiler
Compile the program hello.c using gcc to
get an executable named hello (Hint: look for the option
-o in the gcc manual). Make sure it runs and
prints what you expect.
Hint 1: For many commands/programs, you can supply a file to work on
simply by adding the filename after the command name, along with any
options. For example, to compile hello.c into an executable
called hello (instead of the default a.out),
we can use:
gcc -o hello hello.cHint 2: To run a program in the current directory, prefix its name
with ./, i.e., ./hello
Task
Take a look at Deliverables 2 and 3 for what to submit.
Now open your chosen terminal editor (nano, Vim, Emacs, joe, …) and modify the program so it prints: your first name followed by a newline and your email address followed by a newline.
Recompile the program and make sure it runs. Commit and push the file to your Github repository. At this point, take a screenshot of the terminal with the editor as requested in [deliverable][Deliberables] 3.
Take a look at the first few sections of the Learn C tutorial. Make the program print your name and email address 20 times using a for loop. Recompile and run. Commit and push the file to your Github repository.
More reading on text editors
Here is a little tutorial on VIM as a resource: https://www.howtoforge.com/vim-basics.
Here is a Vim Basics in 8 Minutes video.
Here’s a tutorial for nano: https://www.howtogeek.com/howto/42980/the-beginners-guide-to-nano-the-linux-command-line-text-editor/
Note: You are not required to use the same terminal editor I use (I’m an Emacs user), but you should become comfortable using at least one terminal editor in this course and we recommend either VIM or Emacs, both powerful highly customizable editors with huge user bases. In general, it is good to have at least basic knowledge of VIM, since some version of it is installed by default on virtually any Unix/Unix-like system. However, the learning curve to do complicated things can be steep.
Deliverables
- Copy and Paste the output from the command-line interface of you
running 10 different terminal commands above into a file called
output.txt(no capitalization, exactly as named.)- Include the command line you used to run the command.
- Do not include any “command not found” results.
- In Codespaces, you should be able to use your mouse to select the
desired text and press the keys
Ctrl(on Windows) orCommand(on macOS) andC(simultaneously) to copy the text to the clipboard. Then open the fileoutput.txtin an editor (e.g.,nano output.txt), paste the text (Ctrl/Command+V) and save the file. - Make sure to ‘add/commit/push’ this file to the repo in your directory.
- Modify the file called
hello.cin your repository as instructed above.- Make sure to ‘add/commit/push’ this file to the repo in your directory after each parts of the task. There should be at least 2 commits for this task in your repo.
- DO NOT add or commit the executable hello. If you did, remove it in an additional commit.
- Take a screenshot of a terminal running a command line text editor
(such as Nano, Vim, or Emacs) over SSH with
hello.cafter you have made it print your name and e-mail.- Save the screenshot as
editor.pngoreditor.jpg. - Make sure to ‘add/commit/push’ this file to the repo in your directory.
- Save the screenshot as
- Create a screenshot of your Github repository’s history page (That
is, “Commits”) after completing the above steps and save it as
repo.pngorrepo.jpg.- Make sure to ‘add/commit/push’ this file to the repo in your directory.
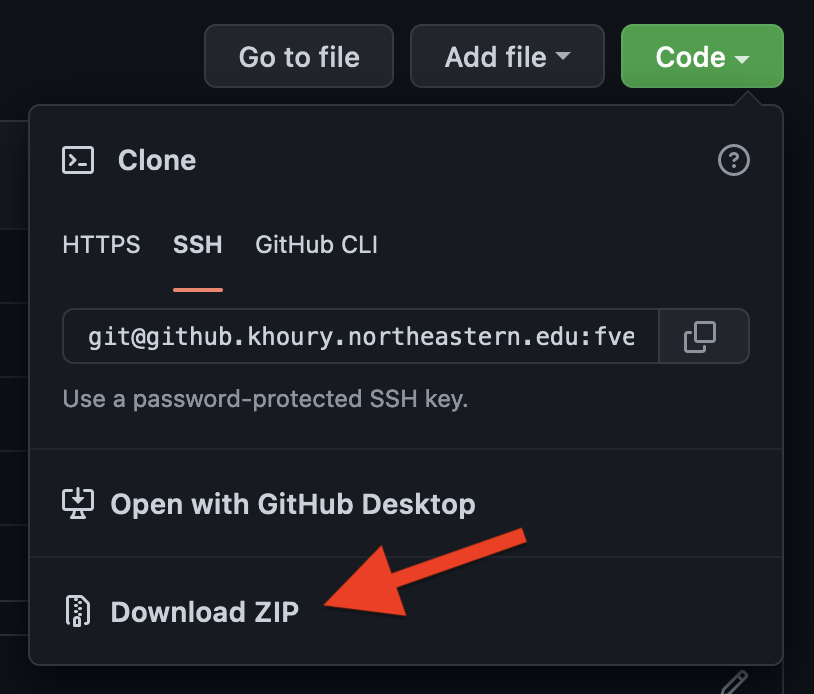
Finally, go to Gradescope and submit a ZIP of your repository. The easiest way to do that is to go on Github and use the “Download ZIP” link under “Code” (see image). You may also connect your Github account to Gradescope and submit directly by pulling from your Github repository. Let us know if you have trouble with any of the steps.